| Prepare Physical Materials for Reformatting |
| Develop Your Digitization Procedures |
| Tips for Scanning Photos and Documents |
| Photographing Musuem Objects |
| Resources and Tools |
Prepare Physical Materials for Reformatting
Review the materials to be scanned as a group and prepare them – perhaps in batches, depending on the size of the collection – to be scanned.
- Remove staples, paper clips, binder clips, or rubber bands (Watch out for sharp ends!)
- Remove items from binders or sleeves
- Review items for torn areas; place severely torn items in a plastic sleeve for scanning. Do not use tape or glue to repair items without consulting a professional conservator.
- Remove loose items like sticky notes
- Set aside any duplicate items
- If appropriate, organize the items in the order in which they will be scanned
- Keep separate any materials with mold or mildew; treat them to kill the mold or mildew before scanning.
- If materials, especially photographs or slides, seem dusty, carefully use an air can or microfiber cleaning cloth to remove the dust
- Examine the glass scanner surface for fingerprints or dust, and wipe or dust off with a microfiber cloth as appropriate.
Tips for safe handling of original materials during digitization projects:
- No food or drinks near collection items
- No pens near collection items – pencil only
- Wash hands regularly; gloves are only recommended when handling photographic materials.
- Always have plenty of room in your workspace to accommodate the material you are working with
- Never use collection items as a work surface
- Do not stack different items together such as books and photos
- Return items to their storage area at the end of the day
Develop your Digitization Procedures
Before you dive into any project, take a test drive. Select a few representative items to scan and try multiple settings so you can be sure to get the results you want. For example, if you’re digitizing a yearbook collection, scan a couple of volumes from different decades to reflect different layouts, color vs. black and white photos, etc. If you’re working with a vendor, they should be able to reformat a handful of sample items so you can see their work before you move forward.
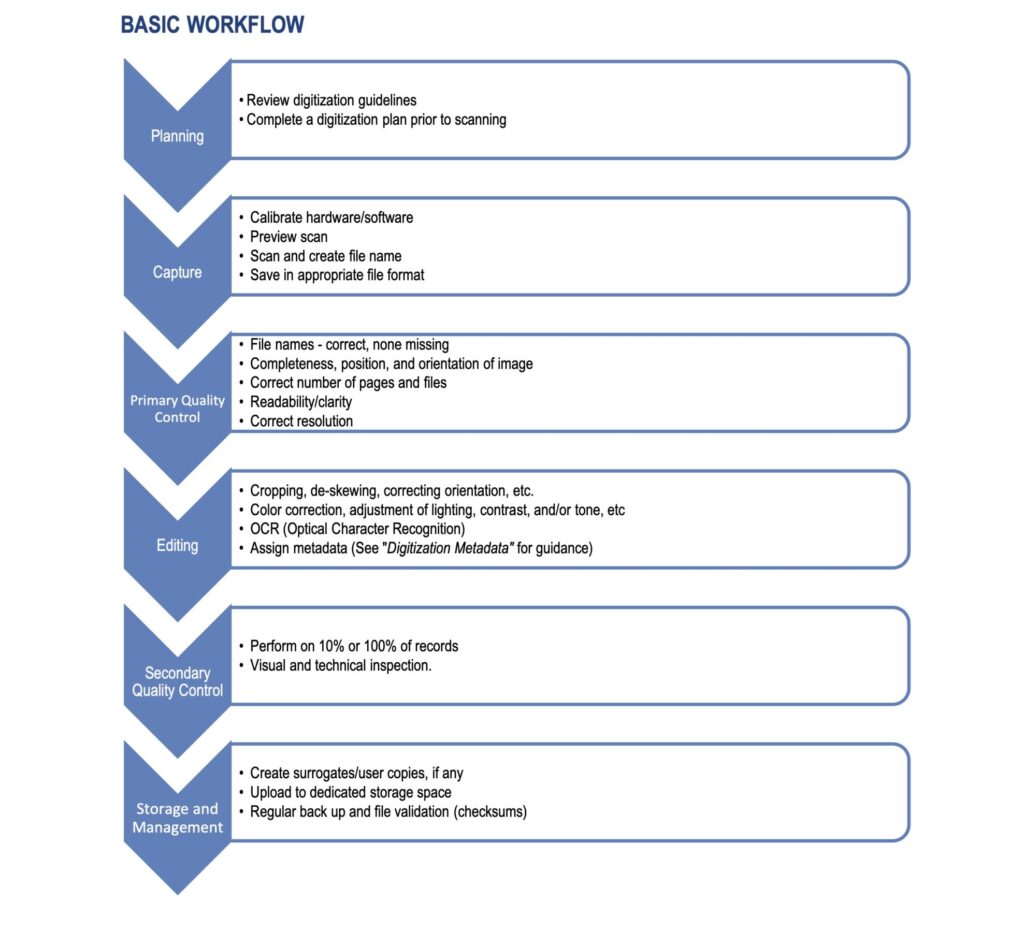
Based on what you learn in this pilot project, create a digitization workflow to document your process. A workflow is simply a sequence of connected, repeatable steps that lay out an activity from start to finish.
Key elements of a digitization workflow might include:
- Create primary file (also known as a “preservation file,” “archival scan/file,” or “raw file”)
- Name the file according to your file naming convention (See Describe section of this toolkit for more information)
- Conduct quality control review
- Create access copy (sometimes called a derivative file or user copy), if needed
- Move primary file to stable storage (See Store section of this toolkit for more information)
Digitization Workflow Examples:
- Scanning and Cataloging Workflow, Chippewa Valley Museum
- Epson Perfection V600 Photo Color Scanner Workflow, South Central Library System
Tips for Scanning Photos and Documents
- Keep scanner glass clean and free of dust
- Use scanning software in “professional” mode
- Turn off all auto settings
- Scan one item at a time
- Use image editing software to crop after scanning, rather than letting the scanner auto-crop
- If there is writing or other information on the reverse side of a photograph, scan that too
Photographing Museum Objects
Our recommendations in this area are still under development, but here are a few resources to get you started:
- Photography Standards and Instructions, Maine Memory Network, Maine Historical Society
- Basic Object Photography, William J. Hill Texas Artisans and Artists Archive
Resources and Tools
- “Tutorial: Scanning Historic Photos.” . Recollection Wisconsin, 2012.
- “Scanning Photos.” Recollection Wisconsin, 2016.
- “Digital Reformatting and File Management.” . Public Library Partnerships Project, DPLA, 2015.
- Digitizing Entire Collections, Chapter 4. Archives of American Art, Smithsonian Institution.
- Woody, Rachel Christine. “Create a Museum Digital Project Workflow That Works.” Lucidea, 2021.
- Hutton, Emily. “How to Convert Film Negatives to Digital Pictures.” Image Restoration Center, 2022.
You must be logged in to post a comment.