Digitization Philosophy
Digitization means taking a tangible object and turning it into a computer file. The umbrella term for this process is reformatting – for instance, scanning a document, photographing an artifact or converting an audiocassette.
The goal of reformatting is to create an accurate digital representation of the original analog object. Aim for the highest level of quality you can afford to create and maintain. Follow a “scan once” policy – do not anticipate returning to re-digitize an item. The digital files you create should be of sufficient quality that you’ll be able to use them for any potential future need – on the web, in publications and even poster size.
At the same time, remember that digitization is not preservation. Digitization complements but does not replace the proper care and storage of your original materials.
Digitization: Do-It-Yourself or Outsource?
Working with a Vendor
It can be challenging to reformat some kinds of original materials, such as large maps, books with fragile bindings and analog audio or video. If you don’t have the equipment, expertise or time to create high-quality digital copies yourself, you might choose to outsource the digitization to a vendor. Working with a vendor may be a more affordable option than investing in the equipment, time and training necessary to do a project in-house. The Digital Library Federation’s Digitization Cost Calculator is a useful tool for estimating in-house digitization costs.
Our tip sheet, “What Does it Take to Work with a Vendor?” provides suggested questions to ask a vendor and the types of information you’ll need to be prepared to provide when you’re contacting a vendor for a digitization project. Recollection Wisconsin also maintains a list of digitization vendors, which is available on request (contact us to get the list).
Choosing Equipment
For small or mid-sized digitization projects done in-house, many cultural heritage organizations choose to use a flatbed scanner. But which scanner is right for you?
Consider:
- Size and format of your original materials – most entry-level flatbed scanners accommodate items up to 8” x 10”
- File formats and other settings – be sure the scanner you select can capture TIFF files
- Avoid scanning “wands” or similar devices
- No one tool will do it all (well)
“Scanners: Good, Better, Best” from the Sustainable Heritage Network is a helpful guide to choosing a scanner.
Scanning: The Basics
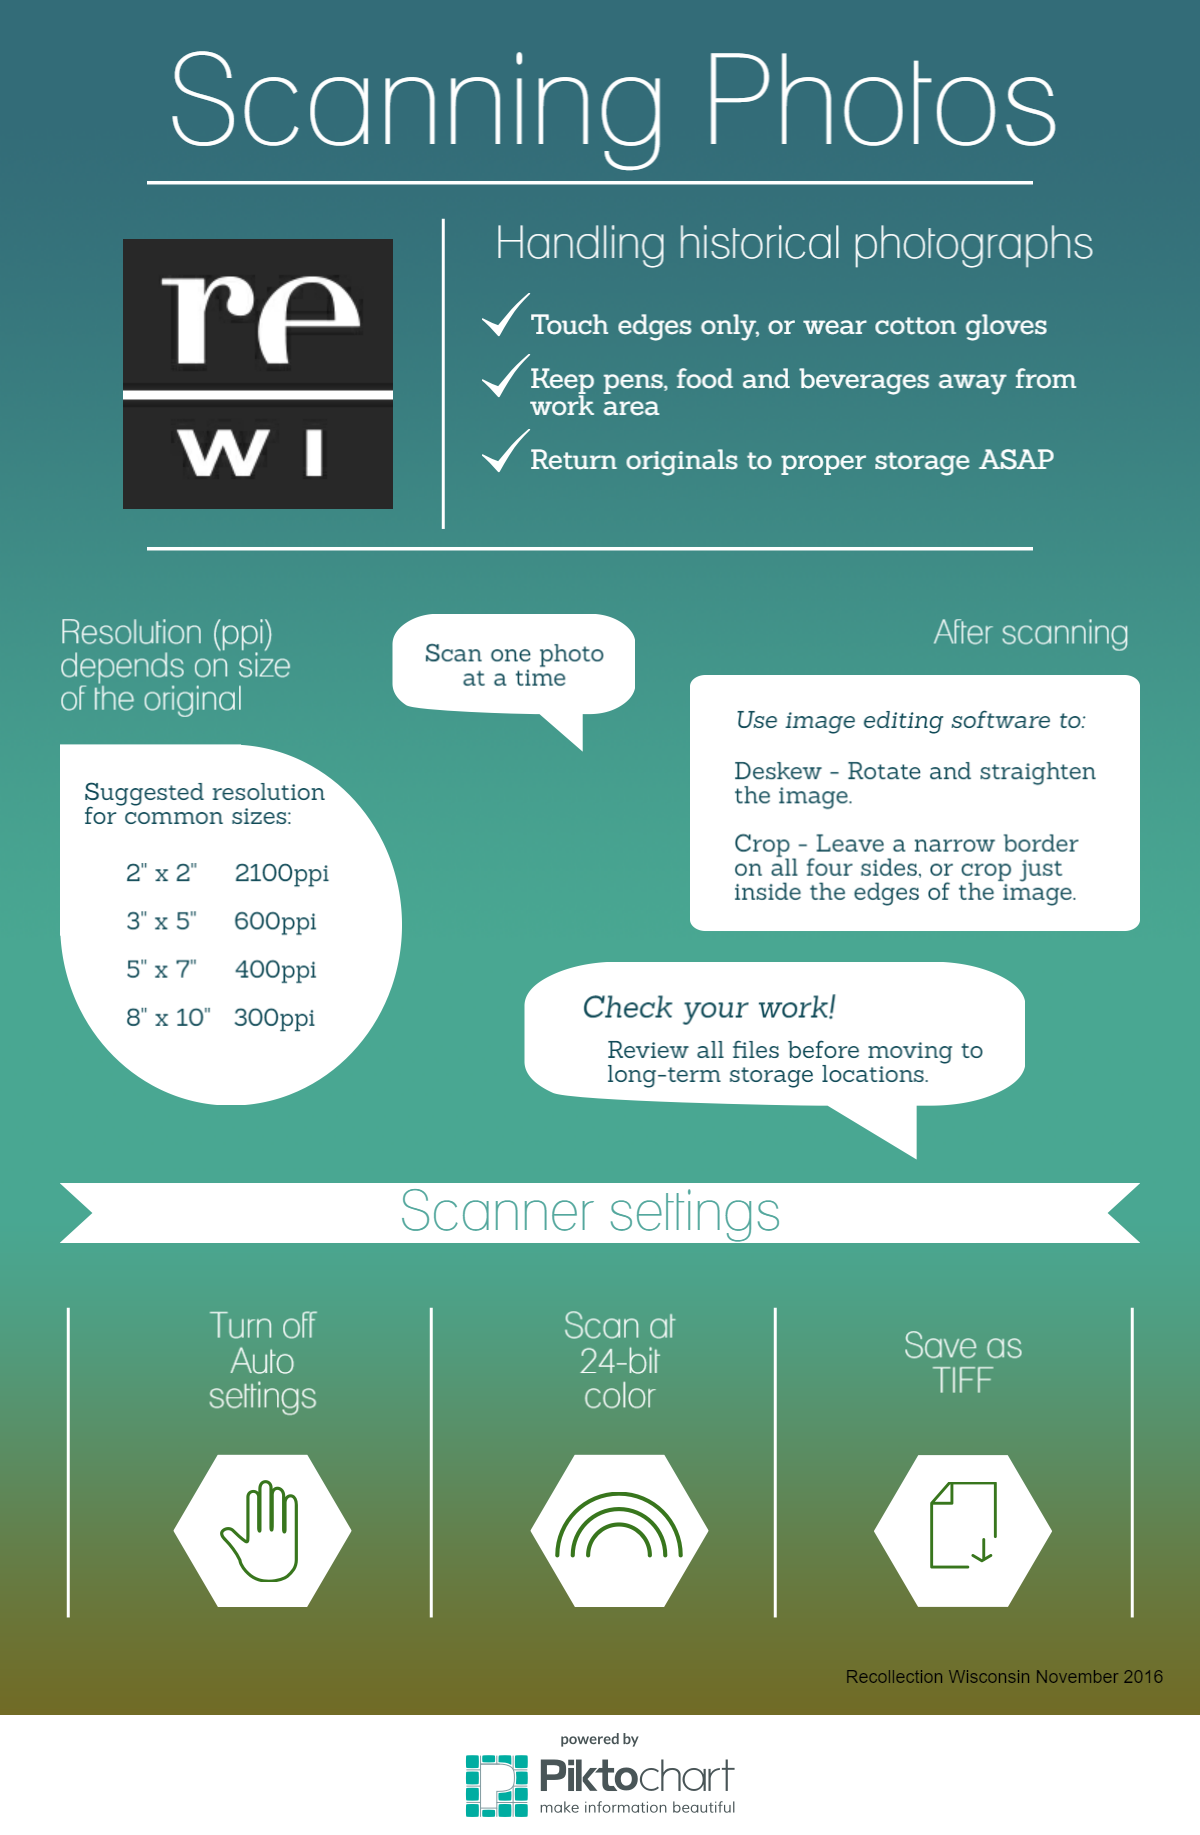
Recollection Wisconsin’s infographic and video tutorial outline the basic steps and settings we suggest for scanning historical photographs. The Wisconsin Heritage Online Scanning Quick Guide describes these steps in more detail.
For more in-depth information on reformatting standards and best practices, see the Technical Guidelines for Digitizing Cultural Heritage Materials from the Federal Agencies Digitization Guidelines Initiative (FADGI) and the Minimum Digital Capture Recommendations from ALCTS/ALA.
Quality Control
As you scan, be sure to review the digital files on a regular basis. This step is especially important when working with volunteers or vendors.
Basic quality control includes confirming:
- File can be opened
- File name is correct
- Image is not rotated or backwards
- Image is not skewed, off-center or unevenly cropped
- No unwanted materials (dust, hair) or digital artifacts in the image
For more on quality control, see the Sustainable Heritage Network’s “Guide to Quality Control and Quality Checklists.”
Further Reading
- Personal Digital Archiving: The Basics of Scanning, The Signal, Library of Congress
- Moving Theory into Practice Digital Imaging Tutorial, Cornell University Library
- Photography Standards and Instructions, Maine Memory Network
- Reformatting — Outsourcing and Vendor Relations, Northeast Document Conservation Center